Getting Started
Enclava is a quote-first operations platform. Every job starts with a quote: once a customer accepts, work is created automatically. Follow these steps to get your account ready.
1. Sign Up
Create your Enclava account through a 3-step wizard. After completing sign-up, you receive an email to set your password.
Step 1: About Your Business
Enter your business name (your URL slug is generated automatically), choose your business type (Delivery or Services), and select your country.
Step 2: Your Account
Enter your name and email address. Tick the Terms of Service and Privacy Policy checkbox, then click Continue.
Step 3: Review & Create
Review your details. When everything looks right, click Create My Business. Enclava sends a link to your email to set your password.
Accept the Data Processing Agreement
After setting your password and signing in for the first time, you are redirected to the DPA page. Read the agreement, check the confirmation box, then click Accept & Continue. Required once. It cannot be skipped.
You land on the Dashboard
Your workspace is ready. Follow the onboarding checklist to complete your setup.
2. First Login
After the initial sign-up, use the login page each time you return.
Open the login page
Go to dashboard.enclava.io and enter your email and password, then click Sign In.
You land on the Dashboard
The app is fully accessible. Pick up where you left off.
3. Set Up Your Business Profile
Before sending quotes or inviting customers, fill in your business information. It appears on all outgoing documents and your public website.
Go to Settings → Business Profile
Click the settings icon in the sidebar.
Fill in your details
Business name, address, VAT number, KvK number, contact email and phone.
Add your logo and brand color
These appear on your public customer-facing website.
Save Changes
A toast confirms the update. Changes are immediately live on quotes and your public site.
4. Get Started Checklist
Your dashboard includes a checklist that tracks onboarding progress. Complete these to unlock the full value of Enclava:
- Complete your business profile
- Add your first customer
- Create and send your first quote
- Invite a team member or driver
- Connect a messaging channel
Roles & Permissions
Every person in your account has a role that controls what they can see and do. Roles are assigned on invite and can be changed at any time from Team settings.
| Feature | Owner | Manager | Staff | Driver |
|---|---|---|---|---|
| Dashboard | ✓ | ✓ | ✓ | ✓ |
| View customers | ✓ | ✓ | ✓ | — |
| Create & edit customers | ✓ | ✓ | — | — |
| Create & send quotes | ✓ | ✓ | — | — |
| Assign work orders | ✓ | ✓ | No | — |
| Complete work orders | ✓ | ✓ | ✓ | Own only |
| Invoices | ✓ | ✓ | — | — |
| Messages | ✓ | ✓ | ✓ | — |
| Invite team members | ✓ | — | — | — |
| Business & operations settings | ✓ | — | — | — |
Driver view /driver | — | — | — | ✓ |
/driver, a mobile-friendly view showing only their assigned deliveries for the day. They do not see the full back-office app.Dashboard
Your command center. A real-time snapshot of the business and the items that need your attention today.
Open Quotes
Quotes in Sent status awaiting customer response. Flags any expiring within 7 days.
Jobs This Week
Work orders scheduled this week. Shows how many are still unassigned.
Unread Messages
Unread conversations across all connected channels.
Revenue (Month)
Total from closed work orders this calendar month, with % change vs last month.
Quote Requests
When a customer submits a request through your public website, it appears as an actionable card. Three options:
Review
Marks the request as reviewed. A Create Quote button appears.
Create Quote
Opens the Create Quote page pre-filled with the customer's details and requested items.
Reject
Removes the request from your list. The customer is notified.
Receiving Quote Requests by Email
Every Enclava account comes with a dedicated email address your customers can use to send quote requests. You do not need to set this up. It is created automatically when your account is created.
Your dedicated address
Your business gets a unique inbox at your-business-name@mail.enclava.io. You can find this address in Settings → Channels. Share it with your customers the same way you would share a phone number.
Customer sends an email
The customer sends a regular email to your Enclava address describing what they need: delivery location, quantity, preferred date, or any other details. No special format is required.
Request appears on your dashboard
Enclava processes the email and creates a quote request card on your dashboard automatically. The customer's message is preserved so you have full context before creating a quote.
Customers
Your customer directory. All contact information linked automatically to their quotes, work orders, and revenue history.
Adding a Customer
Go to Customers → Add Customer
The customer grid shows all existing customers. Click Add Customer in the top-right.
Fill in the details
Only Name is required. Email, phone, and address are optional but recommended for quote delivery.
Click Create Customer
The customer card appears in the grid immediately.
Viewing & Editing
Click any customer card to open their detail panel: quotes, work history, and revenue. Click Edit in the panel to update their information. Uncheck Active to deactivate a customer without deleting their data.
Quotes
Every job starts with a quote. Work orders are only created when a customer accepts. This is enforced by the system and cannot be bypassed.
Quote Lifecycle
Creating a Quote
Quotes → New Quote
Click New Quote in the top-right corner of the Quotes page.
Select a customer
Start typing to search. If the customer doesn't exist yet, click + New Customer to create them inline.
Choose quote type
One-time for a single job. Recurring for a repeating service: shows additional frequency and schedule fields.
Add line items
Click Add Item. Each item has a name, quantity, and unit price. The total updates automatically including your configured tax rate.
Set dates
Scheduled Date: when the job will be performed. Valid Until: quote expiry date.
Save as Draft
Stored as a draft. Not visible to the customer yet.
Sending a Quote
Click on a Draft quote to open it → click Send
A dialog asks how you sent it to the customer.
Choose the channel
WhatsApp, Email, Phone, or In Person. Recorded for audit purposes.
Quote moves to Sent
The customer can view via their unique link. The quote is now locked from further editing.
Accepting a Quote
Click on a Sent quote to open it → click Accept
A dialog asks for the customer's name and how they accepted.
Confirm
Enclava records who accepted, when, and how: your permanent audit trail.
Work Order created automatically
Go to Work Orders: the job appears with status New, ready to be assigned.
Duplicate a Quote
Click on any quote to open it, then click Duplicate to create a copy as a new Draft. Useful for repeat orders or similar jobs for different customers.
Editing and Revising
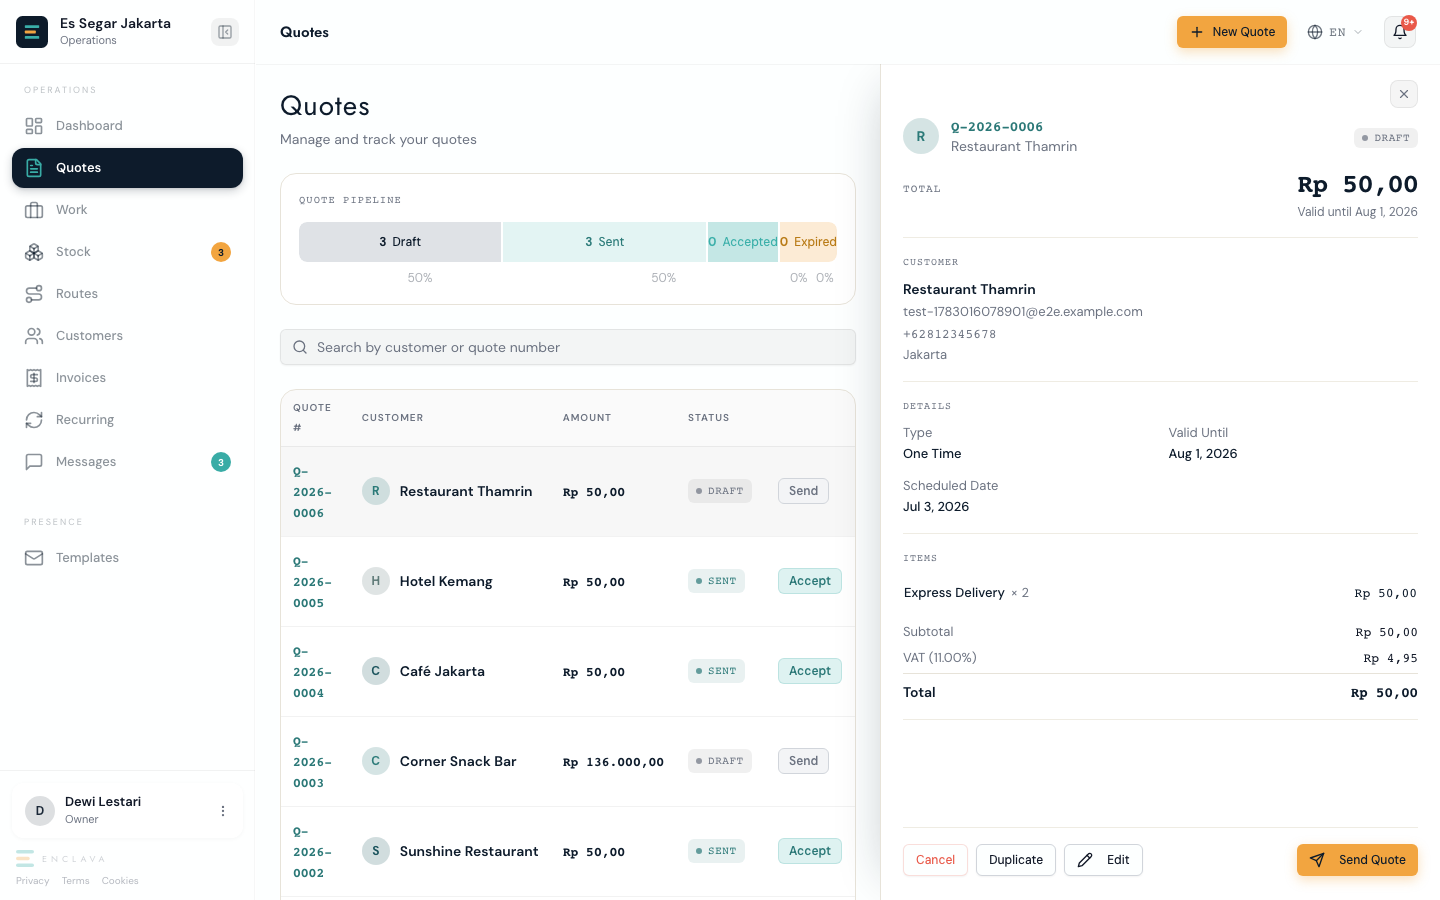
Only a Draft quote can be edited. Open it and click Edit to reopen the quote builder and change items, dates, or terms, then save.
Once a quote is Sent, its items and price are locked and cannot be edited directly. If the customer needs different terms, use Duplicate to start a fresh draft with the same customer and items, adjust it, and send it as a new quote. Duplicating does not change or cancel the original quote or any work order created from it.
Rejecting
Open a Sent quote and click Reject to record that the customer declined, with an optional reason. Rejection is final: no work order is created, and a rejected quote cannot be reopened.
Resending
The Resend Email button appears on a quote's detail panel only while it is Sent and was originally sent by Email. Use it if the customer says the email never arrived, or asks for it again. The quote's status and Valid Until date do not change.
Expiry
Every quote has a Valid Until date, set when it is created. If a Sent quote passes that date without being accepted or rejected, Enclava automatically marks it Expired overnight. No action is needed on your side.
Advance Payment and Proforma
When creating a one-time quote, set Payment Timing to Advance payment (customer pays first) instead of the default Pay after service. This requires either a payment provider connected under Settings → Payments, or your bank account IBAN added under Settings → Operations. Enclava blocks creating or accepting an advance-payment quote without one.
Accepting an advance-payment quote does not create a work order right away. Enclava automatically generates and sends a proforma invoice with payment instructions instead, and creates the work order only once that invoice is paid. Until then the quote shows an Awaiting Payment badge in place of Accepted.
Quote Status Reference
Every quote moves through a fixed set of statuses. Here is what each one means and what you should do.
| Status | What it means | What to do |
|---|---|---|
| Draft | The quote is being prepared. Only you can see it. The customer has not been notified. | Fill in the service details, delivery address, and line items. Click Send when ready to share with the customer. |
| Sent | The customer has received a link to review and accept the quote. You are waiting for their response. | Monitor for acceptance. Use Resend if the customer hasn't responded. If terms need to change, use Duplicate to send a fresh draft instead. |
| Accepted | The customer accepted the quote. A work order was automatically created. The quoted price is now locked and cannot change. | Go to Work Orders to assign the job and schedule delivery. The quote itself is now read-only. |
| Rejected | The customer declined. No work order is created. This is a terminal state. The quote cannot be reopened. | Use Duplicate to create a revised offer at a different price or scope, then send the new quote. |
| Expired | The quote passed its due date without a response. No work order is created. This is a terminal state. | Use Duplicate to reissue the quote with a new expiry date if you still want to win the job. |
| Revised | This version of the quote was superseded by a new revision. Any open work orders linked to it are cancelled. The original quote is archived. | Find and send the new revision, which will be in Draft status. The revised quote cannot be edited or re-sent. |
| Cancelled | The quote was cancelled before being sent or while still in draft. No customer was notified. | Use Duplicate if you need to start over from a similar quote. |
Work Orders
Work orders represent the actual jobs your team performs. Always created from an accepted quote, never created manually.
Work Order Lifecycle
Assigning a Work Order
Open the Work page on the Week view
The board has a row for each person and a column for each day. Jobs nobody holds yet sit in the Nobody yet row, and jobs with no date wait in the tray below the board.
Drag the job onto a person and a day
One drag assigns the job and schedules it. Each job also has a menu, the three dots on it: Assign to picks a person and Move to picks a day. From the keyboard, focus the job, press Space, move it with the arrow keys and press Space again.
Or open the job and click Assign it
Pick a person in the job's record and click Assign. A service business can pick a staff member or driver, you or a manager. A delivery business picks a driver, you or a manager: staff cannot be given a delivery. Status changes to Assigned, and the person sees the job in their work list immediately.
/work/assign) for a faster bulk-assignment view: unassigned jobs on the left, and on the right everyone you can assign: your drivers, you and your managers, and in a service business your staff too.Completing a Work Order
Open the job and click Complete it
Add a note if there is one, for example "Delivered to reception".
Confirm
Status changes to Completed. You can now generate an invoice for this job.
Closing a Work Order
Closing means the job is fully settled: payment received, any issues resolved. Once closed, no further changes can be made and the revenue counts toward your monthly total.
Open the job, click Close it, choose whether to charge the customer for it, and confirm.
Raising a Dispute
If there is an issue with a completed job before you close it, flag it first. Open the job, click Dispute it, say what went wrong, and confirm. Status changes to Disputed. Once resolved, close the order normally.
Work Order Status Reference
Every work order moves through a fixed set of statuses. Here is what each one means and what you should do.
| Status | What it means | What to do |
|---|---|---|
| New | The work order was just created from an accepted quote. No one is assigned yet. The job is waiting to be scheduled. | Assign someone to the order: a staff member or driver, or yourself or a manager (a delivery business assigns drivers, never staff). You can also put it on a route in Route Planning: dispatching the route assigns it to the person running the route. |
| Assigned | Someone has been assigned. The job appears in their work list, and on their route if it is on a dispatched route. | Wait for the job to be completed. You can reassign to a different person if plans change. In Route Planning, Plan Day puts the job on the route of the person who holds it (a job held by staff stays off routes), and dispatching never takes it away from them. |
| Completed | The job has been performed and marked done, either by the driver completing their stop or manually by a manager. Delivery is done. | Review the work order and click Close once payment is received and everything is settled. Or raise a Dispute if there is an issue. |
| Disputed | A problem was flagged after completion: damaged goods, wrong delivery, customer complaint, etc. The order is on hold until resolved. | Investigate the dispute. Once resolved, click Close to settle the order. Disputed orders cannot be re-opened or rolled back. |
| Closed | The job is fully settled: delivered, reviewed, and closed. This is a terminal state. No further changes are possible. | Nothing. The order is complete. Revenue from this order is counted in your monthly totals. |
| Cancelled | The job was cancelled before completion, either by an owner or a manager, or as a side effect of revising the original quote or of a change to its contract (cancelled, or that date skipped). Cancelling a route never cancels its jobs. This is a terminal state. | If the job still needs to happen, go back to the original quote and issue a new revision, or create a new quote for the customer. |
Route Planning
Route Planning is the operator workspace for planning and dispatching each day's routes. Dated work orders that are not on a route yet appear here as unrouted stops. One click builds routes around whoever already holds each job, and dispatching a route gives its unassigned jobs to whoever runs it.
Creating a Quote with a Delivery Address
The route planner works best when work orders carry precise location data. Set the address when you create the quote. It flows through to the work order automatically.
Select the customer
If the customer has a saved address, a Use customer address link appears beneath the selector.
Use customer address, or search a new one
Click Use customer address to fill the location and geocode the coordinates in one step. Alternatively, type in the Location Address search box: a dropdown of matching addresses appears as you type. Select a result to fill the field and place the map pin.
Adjust the pin if needed
The map shows the geocoded pin. Drag it to the exact gate or entrance. The coordinates update as you drag.
Set the Scheduled Date
The route planner groups work by scheduled date. Set this to the delivery date so the stop appears on the right day.
Route Lifecycle
Planning the Day
Go to Routes
Click Routes in the sidebar. The page opens on today's date. Use the date picker to select a different day.
Click Plan Day
Enclava builds routes around whoever already holds each job. A job someone holds goes on that person's route. A new job on a contract goes on the route of the contract's regular person. Any other new job goes on one route without a person yet, and you pick one before dispatching. A route's person must be a driver, you or a manager, so a job held by staff, or whose contract's regular person is staff, stays unrouted and is listed on its own. Staff work those jobs from their work list once they hold them.
Review and adjust
Drag stops within a route card to reorder them. Click Re-seq to put the stops back in nearest-first order from your depot. Use Add stop on the route card to add an unrouted job: only a job nobody holds, or one the route's person already holds, can be picked. Click the icon on a stop to open the work order in a side panel.
Assigning a Driver and Dispatching
Pick the route's person
The person picker on the route lists your active drivers, you and your managers. The Dispatch button is only enabled once someone is picked. You can change the person while the route is in planning, unless one of its jobs is held by someone other than the new person.
Click Dispatch
The route status changes to Dispatched. Every job on it that nobody holds is assigned to the route's person, and a job they already hold stays theirs. Dispatch never takes a job away from whoever holds it: if a job on the route is held by someone else, nothing is dispatched and Enclava names each such job and its holder, so you can reassign the job or remove its stop and dispatch again. The route's person sees the route in Today's Route with a map, progress bar, and stop list; if that is you, the planner links you to it on the day.
Work ↔ Routes Navigation
Work orders and routes are linked. You can jump between them without losing context:
- Routes → Work: Click the icon next to any stop to open the work order detail panel on the Work page.
- Work → Routes: Open a work order detail on the Work page. A View in Routes link takes you back to the route this work belongs to.
When a Stop is Skipped
If a driver skips a delivery stop (customer not home, gate locked, etc.), the route enters Needs Review status when all other stops are done. You will see:
- An amber banner on the route card: "Some stops were skipped. Remove them to complete the route."
- The skipped stop is shown with a ✗ marker and the driver's skip reason.
Review the skipped stop
Click the icon on the skipped stop to open the work order and decide how to handle it: reschedule, contact the customer, etc.
Remove the skipped stop from the route
Click × next to the skipped stop to remove it from the route. The work order returns to the unrouted pool and can be scheduled on another day.
Mark Complete
Once all skipped stops are removed, click Mark Complete to close the route.
Route Status Reference
Every route moves through a fixed set of statuses. Here is what each one means and what you should do.
| Status | What it means | What to do |
|---|---|---|
| Planning | Route is being built. Stops are not locked yet. The driver cannot see it. | Add or remove stops, drag to reorder, assign a driver, then click Dispatch. |
| Dispatched | Route has been sent to the driver. Stops are locked and the driver can see the full stop list. | Wait for the driver to start. If you need to make changes, click Recall to bring it back to Planning (only possible before the driver acts on any stop). |
| In Progress | The driver has started: they completed or skipped at least one stop. Deliveries are happening now. | Monitor progress on the route map. No changes to stops are possible while the driver is on the road. |
| Needs Review | The driver finished their route, but one or more stops were skipped (customer not home, gate locked, etc.). The route cannot close until you resolve each skipped stop. | Open each skipped stop's work order to decide: reschedule it (it returns to the unrouted pool) or cancel it. Once all skipped stops are removed, click Mark Complete. |
| Completed | All stops have been delivered (or resolved after skipping). The route is closed. No further changes are possible. | Nothing. The day's deliveries are done. Work orders linked to completed stops are automatically marked completed. |
| Cancelled | The route was abandoned. Work orders the dispatch assigned, and that its person still holds, are unassigned; every work order leaves the route and returns to the unrouted pool. Cancelling a route never cancels a work order. | The affected work orders will appear as unrouted again. Reschedule them on another date or create a new route for today. |
Invoices
Invoices are generated from closed work orders. Enclava handles numbering, line items, and totals automatically.
Generating an Invoice
Open a Closed work order → Generate Invoice
Enclava creates a draft invoice pre-filled with the customer, line items, and total.
Review and send
Open the invoice in your Invoices list, verify the details, then click Send Invoice.
Both steps can happen for you. Under Settings, Operations, Invoice finished jobs automatically writes the invoice the moment a job is closed, and can send it to the customer as well. Jobs on a contract stay out of it: those are billed together on the contract's period invoice.
Invoice Statuses
- Draft: Created but not yet sent.
- Sent: Issued to the customer, awaiting payment.
- Paid: Payment confirmed and recorded.
- Overdue: Past due date with no payment recorded.
Sent means you issued the invoice, which is not quite the same as the customer receiving it. When Enclava can tell straight away that the email did not go out, it says so beside the status. It cannot tell you about a message that was accepted and then bounced later, so no flag is not the same as confirmed delivery:
- No email address: this customer has none on file, so no email went out. The invoice is still issued and the PDF is still there to send over WhatsApp or print. Add an email address to the customer if you want Enclava to send it.
- Not delivered: the email was attempted and did not go out. Use Resend Invoice once the problem is fixed.
Downloading the PDF
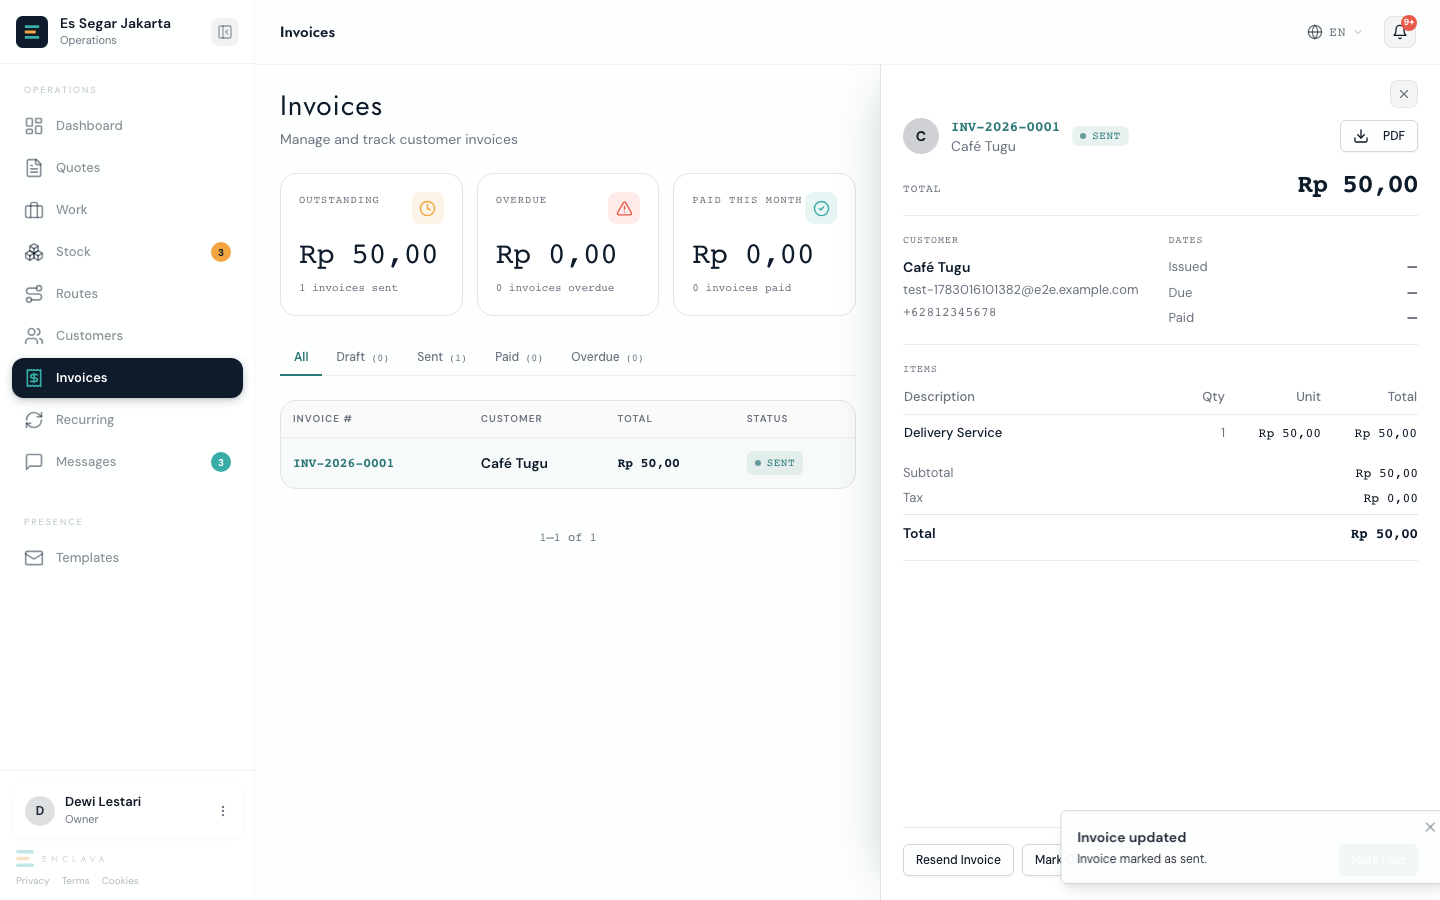
Click PDF in the invoice's detail panel to download it at any time, in any status. This is handy for your own records or to send outside Enclava.
Resending
While an invoice is Sent or Overdue, click Resend Invoice to email it to the customer again, including the payment link if one exists. The status does not change, and the resend is recorded in the invoice's history.
Cancelling
An invoice can be cancelled while it is Draft, Sent, or Overdue: click Cancel and confirm. This cannot be undone.
Payments on an Invoice
If a payment provider is connected (see Payments), sending an invoice automatically creates an online payment link. The invoice panel shows an Online Payment section with the live payment status and Copy link / Open buttons.
Once the customer pays, mark the invoice paid from the panel. When Enclava has already detected the online payment, confirming from the panel simply records it; use the same action to record a payment received another way, such as a bank transfer or cash.
Recurring Services
Recurring commitments are created automatically when a customer accepts a Recurring-type quote. They represent an ongoing service agreement, for example a weekly delivery contract.
Commitment Lifecycle
Managing Commitments
Go to Recurring in the sidebar to see all active agreements. Click a commitment to see its detail: frequency, amount per occurrence, customer, and linked work orders. From the detail page you can pause or cancel.
Stock
Track the supplies your team uses on the job, cleaning products, delivery packaging, and other consumables, so you always know what's on hand before you run out.
Setting Up Stock
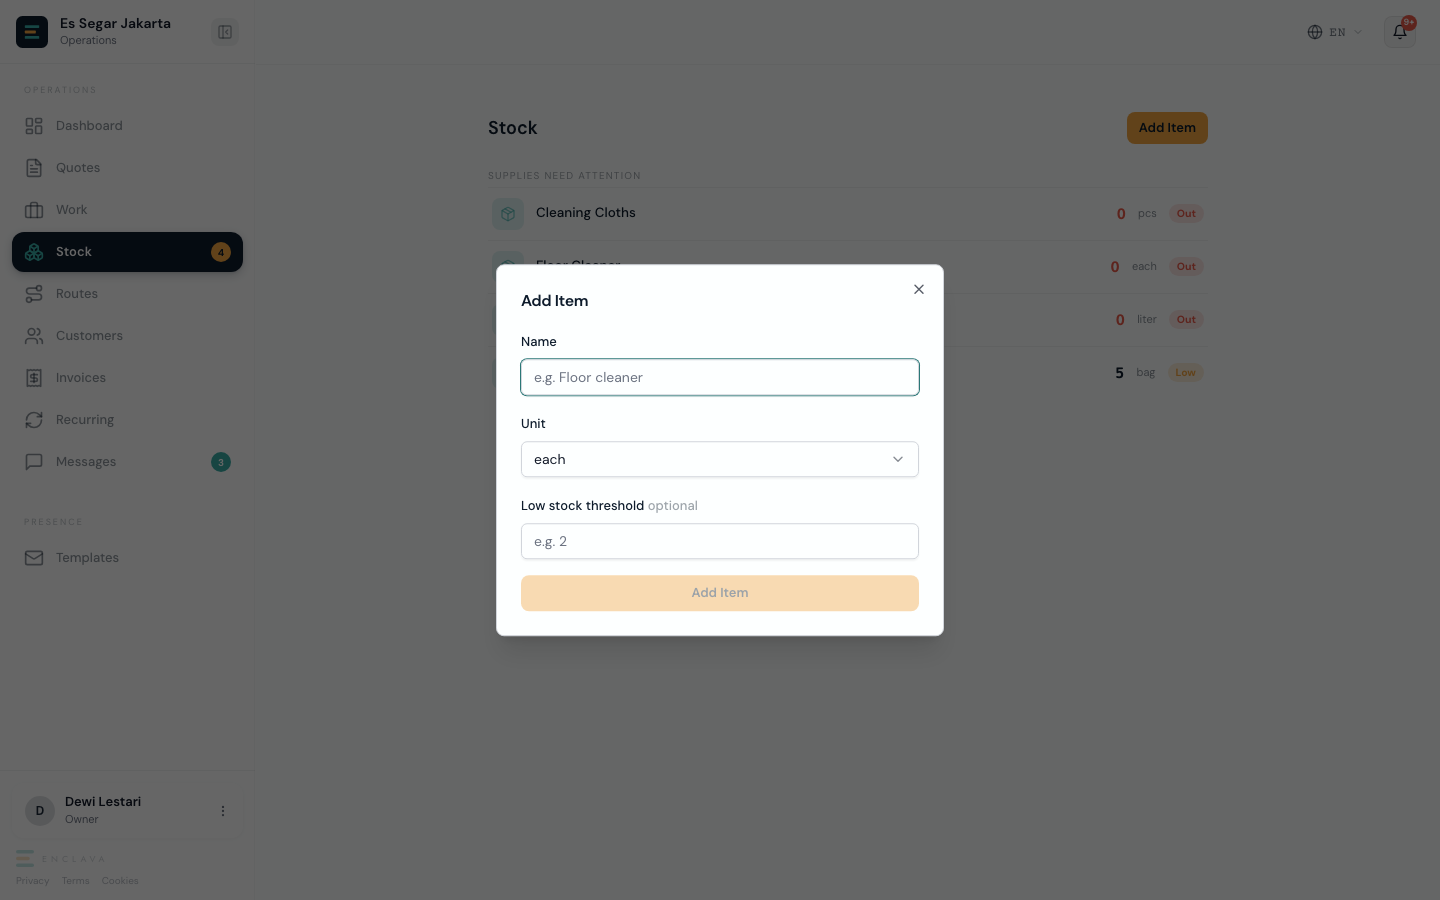
Open Stock
The first time there are no items yet, Enclava shows a starter checklist based on your business type instead of an empty page.
Check off the items you use, or add your own
Uncheck anything you don't need, then click the button below the list to add the checked items. Prefer to start blank? Click Add my own items instead. Every item needs a name and a unit; a low stock threshold is optional.
Bring quantities up to date
New items start at zero. Open an item and use Add stock to record what you actually have on hand.
Linking Stock to Products
If you already quote from a product catalogue, link a product to stock instead of adding a separate item:
- Click Track a product on the Stock page and turn on the products you want to track. Each one creates a linked stock item.
- Add that product to a quote and the line item shows how much is available, for example Available 12.
- If tracking would take an item below zero, the available count shows in red so you catch an over-commitment before sending the quote.
- Stock is reserved when the quote is accepted and used when the work order is completed.
Counting and Adjusting
Click any item in the list to expand its inline counter:
- What's left: enter the quantity you actually counted and click Save. Enclava shows the difference, for example Was 20 · Used 5, and logs it to the item's history.
- Add stock: record newly received supply without doing a full recount.
- Recount whenever a physical count does not match what Enclava shows: after a delivery logged outside the app, at the end of a shift, or whenever something looks off.
Low-Stock Alerts
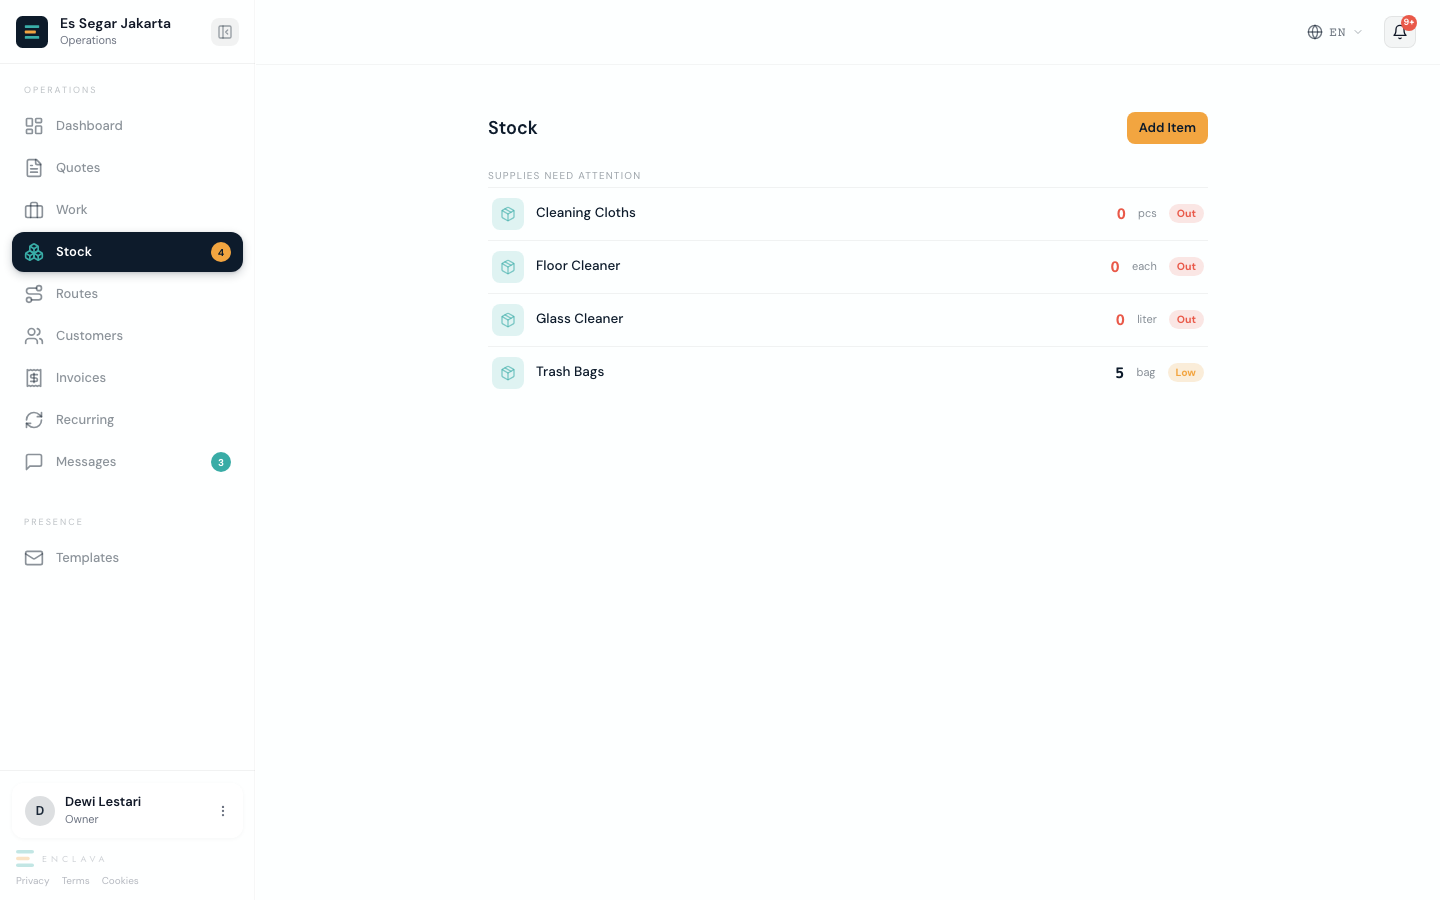
Each item can have its own low stock threshold. When available quantity drops to or below it:
- The item gets an Out or Low badge and moves into the "needs attention" group at the top of the list.
- The Stock link in the sidebar shows a count of items that need attention.
- Owners and managers get a notification the moment an item newly crosses below its threshold, linking straight to the Stock page.
Set a default threshold for new items in Settings → Operations → Inventory Settings. Existing items keep whatever threshold they were given individually.
Messages
All customer conversations across WhatsApp, email, Instagram, and Telegram in one unified inbox. Never miss a message regardless of which channel your customer uses.
Connecting a Channel
Go to Settings → Channels to connect:
- WhatsApp: Connect your WhatsApp Business account via the guided Meta setup. You will need a Meta Developer App with the WhatsApp product enabled.
- Email: Click Connect on the Email card. A dedicated inbound address is provisioned automatically, no configuration needed.
- Instagram: Connect your Instagram Business profile via the same Meta flow as WhatsApp. Both channels share the same Facebook Page.
- Telegram: Create a bot with @BotFather on Telegram, copy the bot token, and paste it into the Telegram connect form.
Settings → Channels
You see a card for each channel. Status shows not connected until you complete the setup.
Click Connect on the channel you want
WhatsApp and Instagram open the Meta Embedded Signup flow. Telegram asks for a bot token. Email provisions automatically.
Complete the channel-specific steps
Once connected, the status badge turns green. New inbound messages from that channel appear in the unified inbox immediately.
Using the Unified Inbox
The Messages page is a two-panel layout:
- Left panel: All conversations sorted by most recent activity. Unread conversations are highlighted. Filter by status (New, Triaged, Awaiting customer, etc.).
- Right panel: Full message thread with the selected customer in chronological order. Replies are sent back through the same channel the customer used.
- Extraction panel: For conversations where a quote request is detected, Enclava shows a suggested summary. Click Create Quote Request to promote it to the quote workflow.
Go to Messages
The conversation list loads automatically. New unread messages appear with a blue highlight and an unread count badge.
Click a conversation to open it
The right panel shows the full message history. The channel icon (WhatsApp, Instagram, Telegram, email) is shown in the header.
Type a reply and send
Your reply goes back through the same channel. For WhatsApp, replies are only available within the 24-hour customer-initiated window.
Create a Quote Request when ready
If the conversation contains a service request, click Create Quote Request. The extracted details (items, date, location) are pre-filled in the quote request form.
Notifications
The bell at the top of every page surfaces what needs your attention right now. Notification Preferences control which events reach you by email and in-app, and daily digests keep the volume manageable as your team grows.
The Notification Center
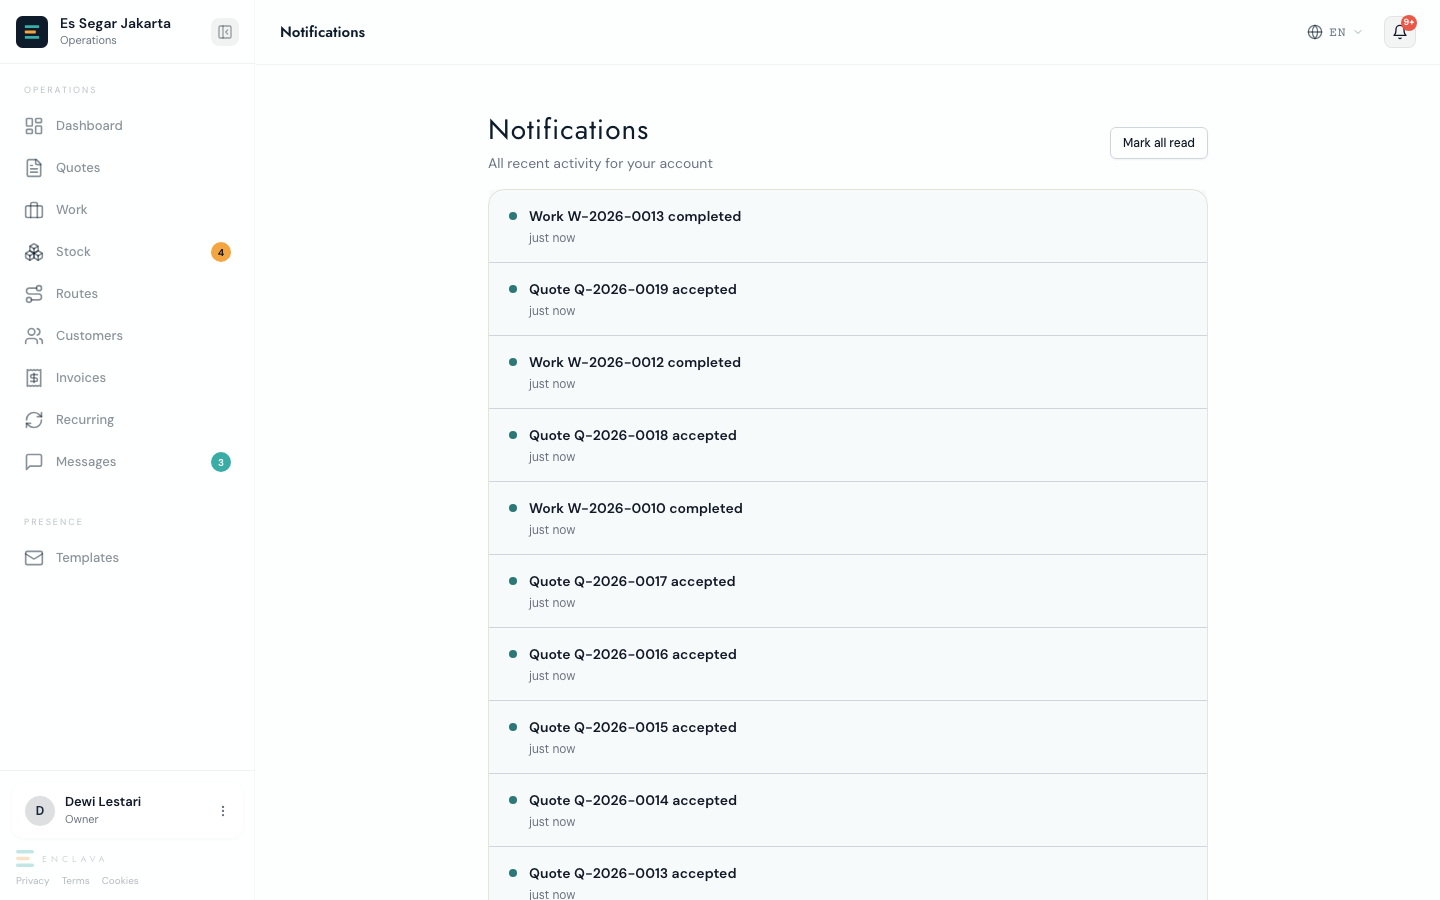
- The bell icon in the top right of every page carries a badge combining your new notifications with unread messages, pending quote requests, and overdue invoices.
- Click the bell to open a short dropdown: quick action items first (unread messages, pending requests, overdue invoices), then your most recent notifications.
- Click a notification to mark it read and open the related page: quote and work updates open their detail view, daily digests and low-stock alerts open the relevant list page.
- Mark all read: clears every unread notification at once, from the dropdown or from the full Notifications page.
- View all activity: opens the full Notifications page, a reverse-chronological history of every event you have been notified about.
Choosing What You Receive
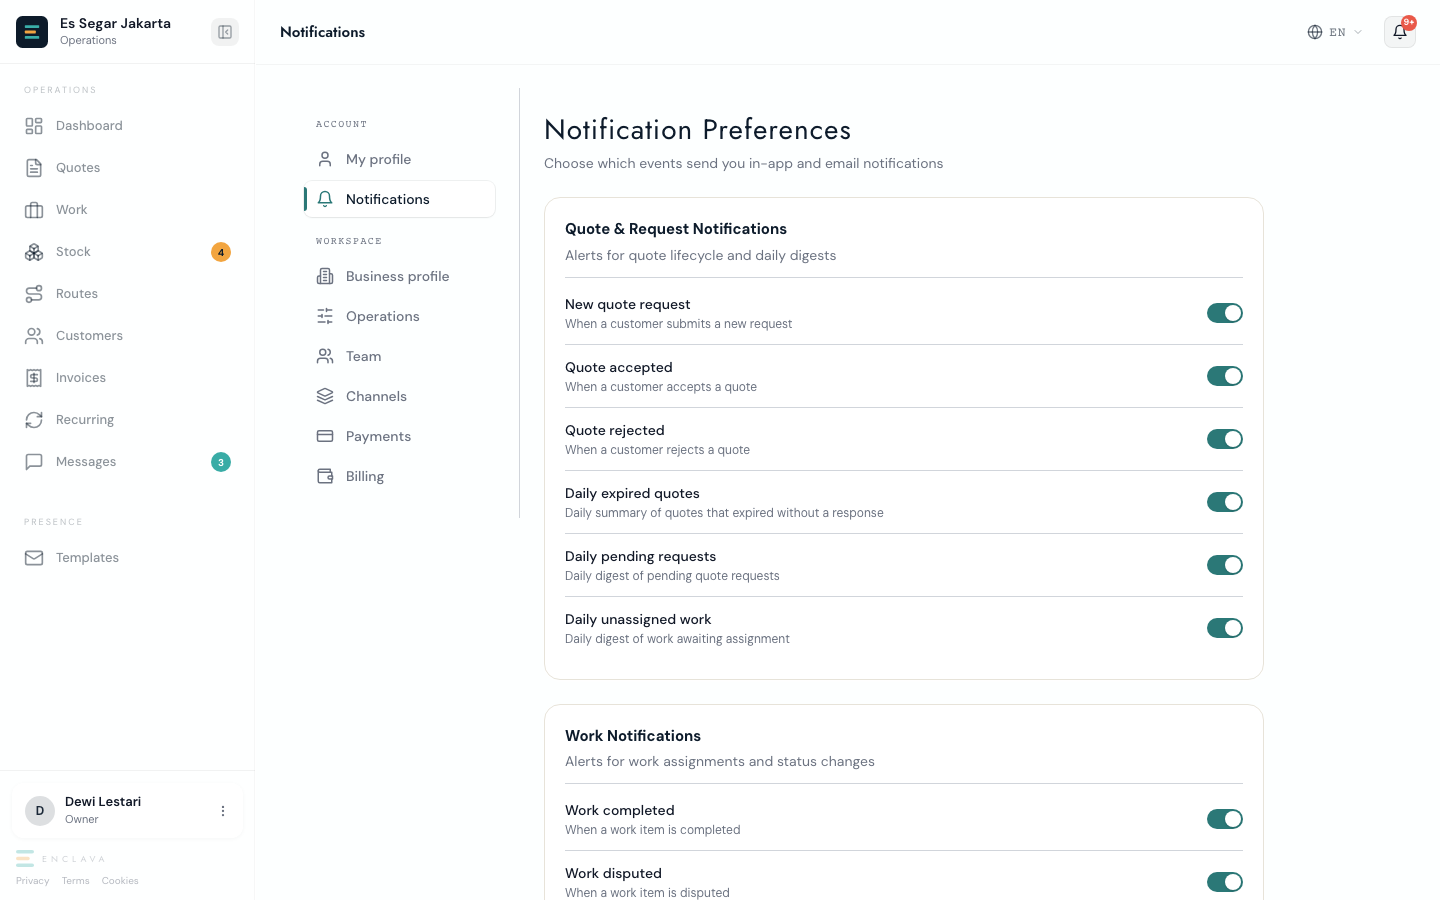
Open Settings → Notifications to choose which events send you an email and an in-app notification. What you see depends on your role.
- Quote & Request Notifications (owners and managers): New quote request, Quote accepted, Quote rejected, plus daily digests for Daily expired quotes, Daily pending requests, and Daily unassigned work.
- Work Notifications for owners and managers: Work completed, Work disputed, and a Daily overdue work digest covering the whole team.
- Work Notifications for staff and drivers: Work assigned to me, Work unassigned from me, "Jobs assigned to me, in one message", Work rescheduled, Work cancelled, and a My overdue work digest covering their own jobs.
Business Profile
Controls everything visible to customers: from your legal name and address on invoices, to your branding on the public website.
Business Information
- Business Name: Your legal trading name. Appears on quotes and invoices.
- VAT Number: Shown on invoices for tax compliance.
- KvK Number: Dutch Chamber of Commerce registration number.
- Address: Business address displayed on all documents.
- Contact Email & Phone: Used for customer-facing communications.
Website Branding
- Logo URL: Link to your logo image.
- Primary Color: Hex color used as your brand accent on the public site.
- Tagline: Short slogan displayed in your site's hero section.
Custom Domain
Your public site is available by default at /s/{your-slug}/. To use your own domain (e.g. orders.yourbusiness.co.id), enter it in the Custom Domain field and follow the DNS instructions shown.
Business Language
The Customer-facing language field controls what customers receive: quote and invoice emails, invoice PDFs, and the public quote portal and request form, in English, Nederlands, or Bahasa Indonesia.
Depot Location
A read-only Latitude and Longitude, geocoded automatically from your Business Address. There is no separate field to set it by hand. Route Planning uses it as the starting point for every planned day: the first stop's distance is measured from here, and it appears as its own marker on the route map. To move it, update the Address, City, or Postal Code above and save. The coordinates recalculate automatically.
Legal and Data Processing
As the owner, you must accept Enclava's Data Processing Agreement before you can create quotes, work orders, or customers. Until you accept it, every visit redirects you to the acceptance screen. Privacy Policy, Terms, and Cookie Policy are available anytime from the links at the bottom of the sidebar.
Team Management
Invite your drivers, staff, and managers (a delivery business invites drivers and managers, not staff). Each person gets their own login and sees only what their role allows.
Inviting a Team Member
Settings → Team → Invite Team Member
The invite dialog opens.
Fill in email, name, and role
Choose Manager, Staff, or Driver. A delivery business offers Driver and Manager, with Driver selected first.
Send Invitation
The team member receives login instructions and can access the app immediately.
Editing or Deactivating
Click ⋮ next to any team member → Edit to change their name, phone, role, or active status (a delivery business cannot change anyone's role to Staff). Uncheck Active to suspend access without deleting the account.
Operations Settings
Configure how pricing and scheduling works for your business.
- Timezone: All scheduled dates, deadlines, and cutoff times are interpreted in this timezone.
- Default Tax Rate: Applied automatically to new quotes. Quick presets: 21%, 9%, 0%.
- Tax-Inclusive Pricing: When on, prices you enter already include tax. When off (default), tax is added on top.
- Close finished jobs automatically: Off by default. When on, a job that has been Completed for the number of days you choose (7 to 90, default 14) is closed for you overnight, as billable. You are notified three days beforehand. Closing is final: after that the job cannot be disputed or marked as not billable, so write off or dispute a job before the deadline. Jobs already Completed before you switch this on are never closed automatically.
- Job assignment: Off by default, so you assign every job yourself. You can instead have Enclava suggest a person for each job; an owner or a manager ticks the ones they agree with, then confirms. Only people ticked here, or on the Team page, are ever suggested, and a delivery business can tick drivers only. The suggestions use fixed rules and no AI.
- Invoice finished jobs automatically: Off by default. When on, closing a job also writes its invoice, from the work that actually happened and at the prices agreed on the quote. Choose whether the invoice waits for you to send it, or goes straight to the customer. Jobs on a contract are not included: those go on the contract's period invoice. Closing a batch of jobs at once always leaves the invoices for you to send.
Payments
Connect a payment provider so customers can pay their invoices online. Enclava never touches your money: funds land directly in your own Mollie or Stripe account.
Connecting a Payment Provider
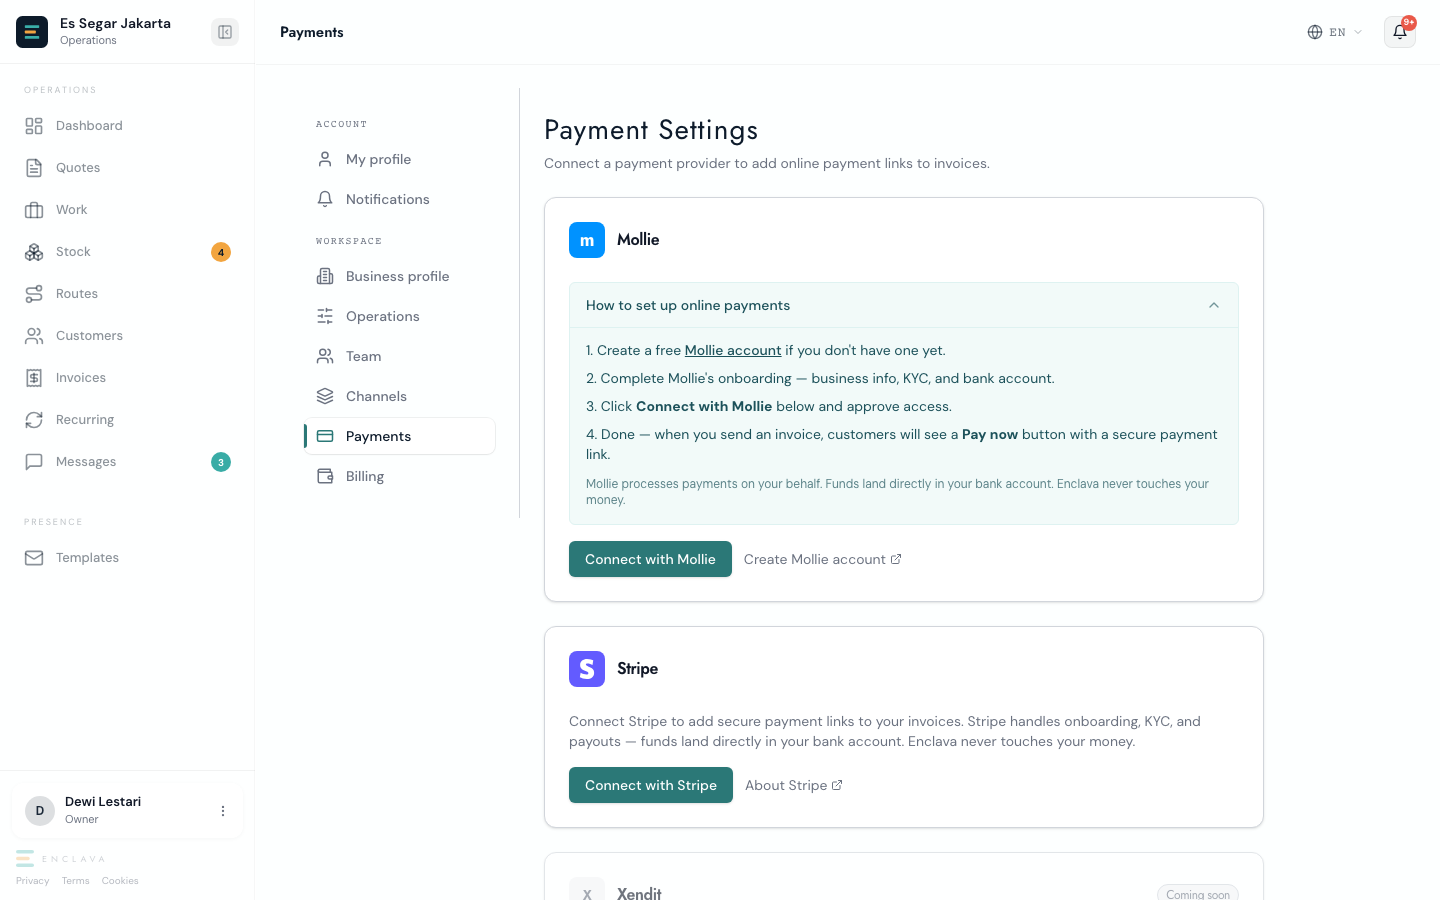
- Mollie: create a free Mollie account, complete its onboarding (business info, KYC, and a bank account), then click Connect with Mollie and approve access. Funds settle straight to your Mollie account.
- Stripe: click Connect with Stripe and complete Stripe's hosted onboarding (business details, KYC, and a bank account). The card shows Setup incomplete until Stripe confirms the account can accept charges; click Resume Stripe setup to continue where you left off.
- Only one provider is active at a time. Connecting a second provider replaces the first as your active one: Stripe takes over once its onboarding is complete; Mollie takes over as soon as you approve it.
- In Indonesia, Xendit is shown as Coming soon and cannot be connected yet.
Payment Links on Invoices
- Once a provider is connected, every invoice you send includes a secure Pay now link the customer can use to pay online.
- The invoice's detail panel shows an Online Payment section with the payment status, the date it was paid, and Copy link / Open buttons.
- Once the customer pays, confirm it from the invoice panel to mark the invoice paid.
- For advance-payment quotes, the automatically generated proforma invoice moves to paid on its own the moment payment completes, which is what creates the work order.
Billing
Your Enclava subscription: current plan, trial status, and Enclava's own invoices to you. This is separate from the invoices you send to your customers.
Your Plan and Trial
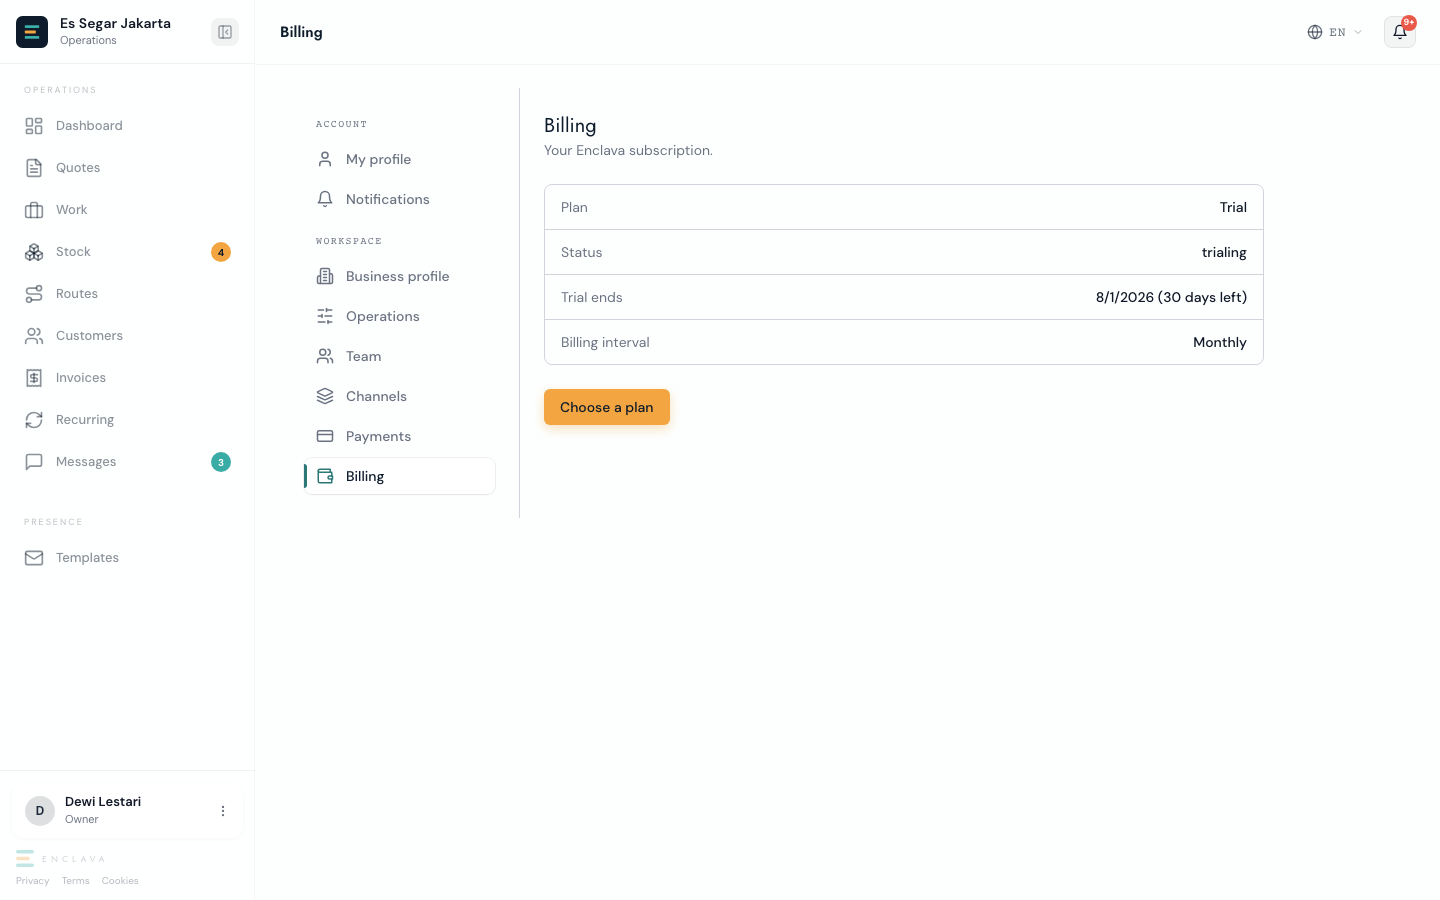
- The plan card shows your Plan, Status, how many days are left in your trial (or your next renewal date once you're on a paid plan), and your Billing interval.
- Click Choose a plan (or Change plan once you're past the trial) to compare Starter and Growth side by side, toggle Monthly or Yearly, and pick one.
- Cancel subscription asks you to confirm, then keeps your access until the end of the current period before it actually cancels. While a cancellation is scheduled, Resume subscription undoes it.
- Switching to a lower-tier plan takes effect at your next renewal, not immediately: you keep your current plan's features until then.
- Opening a feature your plan does not include, for example Stock or Route Planning on Starter, shows an upgrade prompt instead of the page.
Enclava Invoices
- Every successful subscription charge produces an Enclava invoice, listed here with its date and amount.
- Click the invoice number to download the PDF.
Templates
Templates control how your brand looks across every customer-facing email, invoice, and portal page, and how your team is alerted internally. Choose a starting style per surface, edit the content blocks, and check the live preview before you save.
What You Can Customize
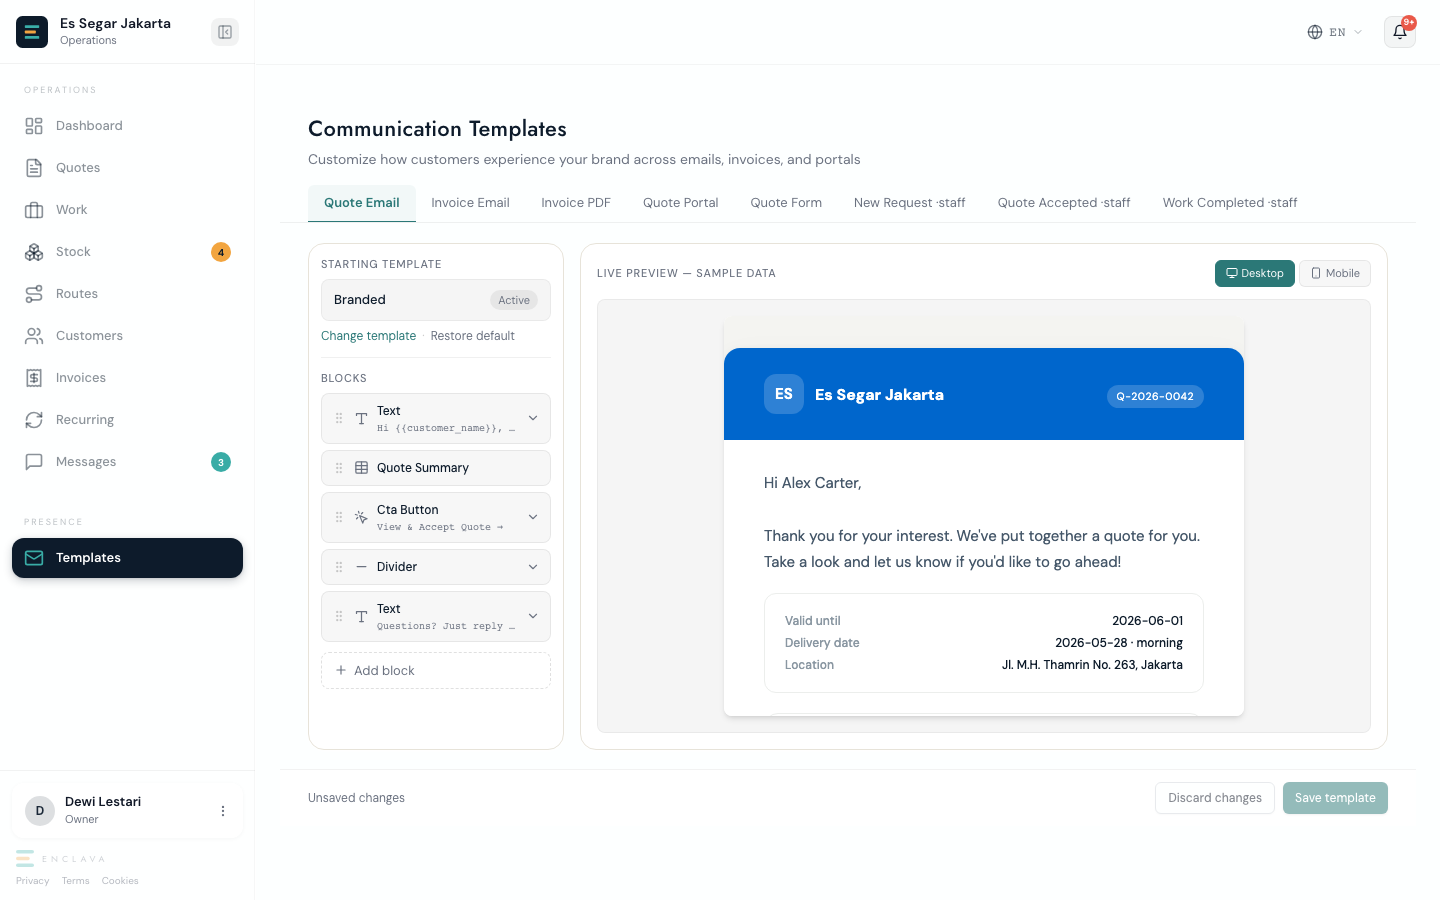
Each surface has its own starting style and blocks, edited separately:
- Quote Email: sent to the customer when you send a quote.
- Invoice Email: sent to the customer when you send an invoice.
- Invoice PDF: the downloadable document attached to that email and available from the invoice panel.
- Quote Portal: the secure page a customer opens from the quote email to review and accept.
- Quote Form: your public page where new customers submit a quote request.
- New Request (staff): the internal alert your team gets when a quote request comes in.
- Quote Accepted (staff): the internal alert your team gets when a customer accepts a quote.
- Work Completed (staff): the internal alert your team gets when a work order is marked complete.
Starting Styles
- Minimal: clean and text-forward, with no heavy branding. Suits formal communication.
- Branded: your logo, primary color, and a call-to-action button. Best for customer-facing surfaces.
- Corporate: a dark header with a structured summary table. Formal and data-dense.
Click Change template on any surface to pick one of the three, then adjust the blocks underneath it. Picking a style resets that surface's blocks to the style's defaults.
Editing and Previewing
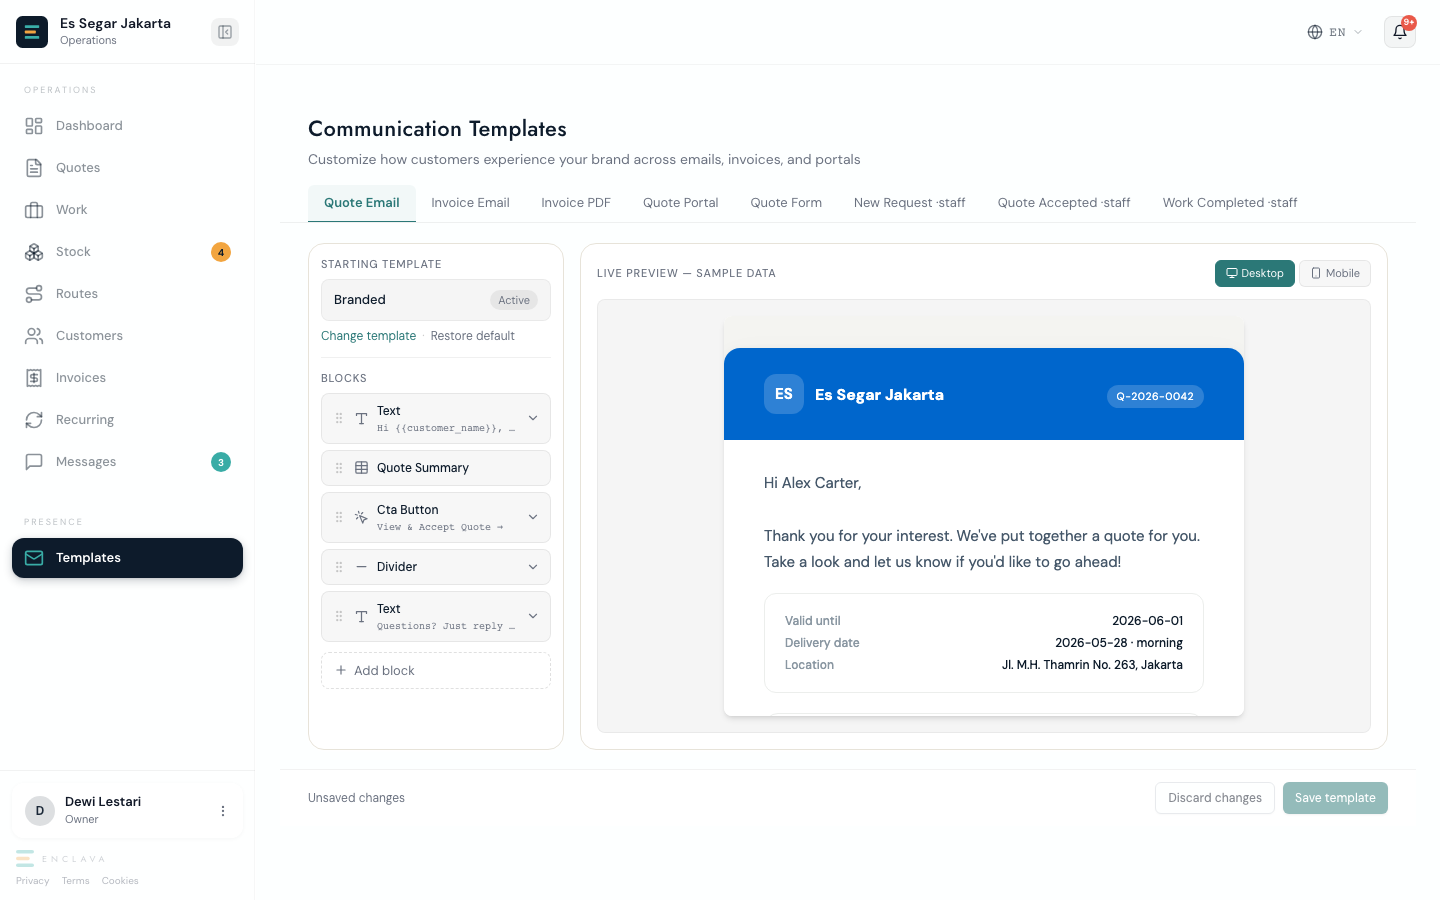
Pick a surface tab
Its saved starting style and blocks load into the panel on the left.
Click a block to edit it
Text blocks open a text field with variable buttons such as {{customer_name}} or {{quote_total}} you can insert. CTA Button blocks let you edit the label and the link. Click Done to apply the change, or the trash icon to remove the block. Add block adds a new text, button, divider, or image block. Quote Summary and Invoice Summary blocks pull your line items automatically and cannot be edited or removed.
Check the live preview
The panel on the right updates automatically with sample data as you edit. Switch between Desktop and Mobile to check both.
Save template
Saves every surface you changed. There is no separate publish step. The next email, invoice, or portal page generated for that surface uses your saved version immediately. Discard changes reverts to what is currently saved, and Restore default resets one surface back to its starting style's default blocks.
Public Pages
Three pages your customers open without logging in: the secure portal where they accept a quote, the form where new customers request one, and your public business page. Each renders in the Business Language set in Business Profile.
The Quote Portal
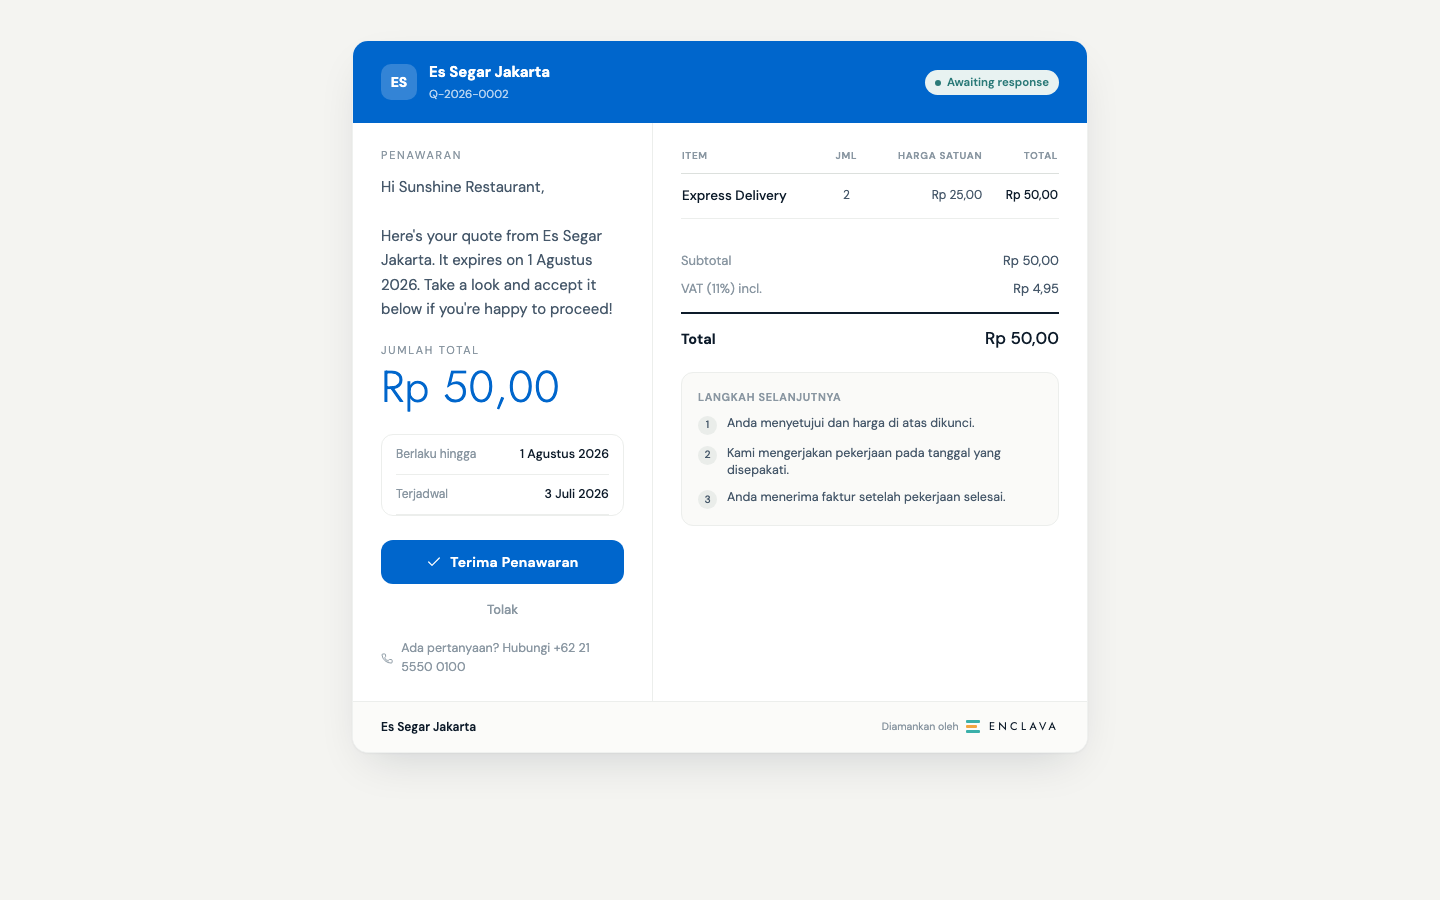
- Every quote you send by email includes a unique link to this page. No customer account or login is needed: the link itself is the access.
- The customer sees the line items, subtotal, tax, and total, the valid-until date, the scheduled date and location if the quote has them, and an accept action with a reject option.
- Accepting here is the same acceptance described in Quotes → Accepting a Quote: the price locks and a work order is created automatically.
- Its colors, logo, and layout come from the Quote Portal starting style you picked in Templates.
The Quote Request Form
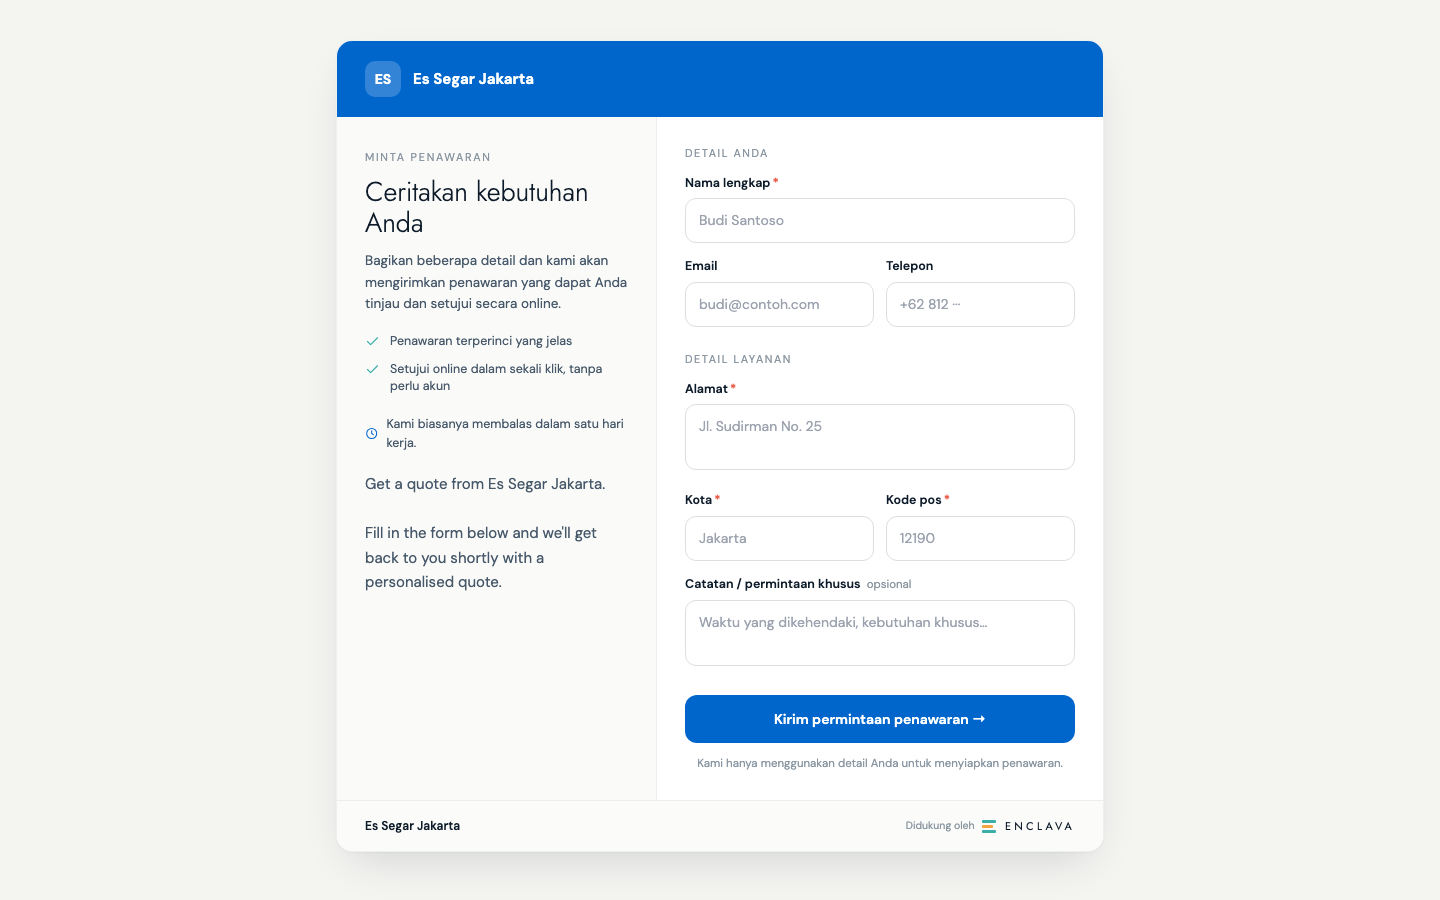
- A standalone page any new customer can fill in to ask for a quote: name, contact details, address, and notes.
- Find its share link on the Quote Form tab in Templates, under Share URL. Copy it into WhatsApp, Instagram, or wherever else you reach customers.
- The Get a Quote section on your business page (below) is the same form embedded there instead of standing alone: both submit to the same intake.
- A submission appears in your dashboard's Quote Requests immediately, exactly like a request that arrives by email.
Your Business Page
Live at /s/{your-slug}/, or your own domain once one is configured. It carries your services, delivery area, an about section, and the request form above.
- From Business Profile, click Preview Website to open the live page in a new tab exactly as customers see it. Business Profile is also where you set your branding (logo, color, tagline) and custom domain.
Driver Guide
As a driver, you log in and go straight to your delivery list for the day. The interface is designed for mobile: simple, fast, and focused only on what you need.
Your Delivery View
When you log in, you land on My Deliveries. At the top are two counters:
Pending
Jobs assigned to you that haven't been completed yet today.
Done Today
Jobs you have completed today. Updates in real time.
Completing a Delivery
Driver view: finding a job and confirming delivery completion
Find the job in your list
Each card shows the customer name, address, and what was ordered. Sorted by scheduled time.
Click Complete
A dialog opens. Optionally add a note, for example "Left at reception" or "Delivered to neighbour at #12".
Confirm
The delivery moves to your Done Today count. The back office sees the update immediately.
Driver Route View
When your manager dispatches a route, it appears in Today's Route, a dedicated mobile interface with a map, progress bar, and a structured stop list. This is different from the general My Deliveries list: stops are ordered, and you work through them one by one.
The Route Interface
Driver route view: map, progress, and confirming a delivery
Map + Route Line
Shows all stops on a map with a teal route line. The current stop is highlighted in teal; completed stops turn green.
Progress Bar
Shows N/M delivered at a glance. Updates in real time as you confirm stops.
Completing a Stop
Navigate to the address
Tap the button to open the address in your phone's maps app for turn-by-turn navigation.
Tap Delivered
The green Delivered button marks the stop as complete. The progress bar updates and the next stop becomes active.
Skipping a Stop
Driver route: skipping a stop and providing a reason
Tap Skip
Use this when you cannot complete the delivery: customer not home, gate locked, address inaccessible, etc.
Enter a reason and confirm
A brief reason is required. It is recorded and shown to your manager on the route planning page. Tap Skip Stop to confirm.
Continue with the next stop
The skipped stop is marked ✗. When all remaining stops are done, the route enters Needs Review and your manager is notified to follow up.
When You Have No Route Today
If your manager hasn't dispatched a route yet, Today's Route shows a "No routes today" message. Check back shortly or use the My Deliveries view if you have individually assigned work orders.
Enclava on Mobile
The Enclava mobile app brings the full operations surface to iOS and Android. Quotes, work orders, customers, invoices, routes, and messages, all in a role-aware interface designed for field and back-office use. Sign in with the same credentials you use on the dashboard.
Role Navigation
- Owner / Manager: Home, Inbox, Work, Quotes, More. The More tab holds quick links to Invoices, Customers, Recurring, Routes, Requests, and Alerts, plus Settings.
- Staff: Home, Work, Customers, Notifications. Focused on today's assigned tasks.
- Driver: Today, Work, Route, Notifications, Profile. Route tab shows the map, ordered stops, and delivery actions.
The Inbox Tab
Inbox lists every conversation across your connected channels, most recent first, with the unread and total counts at the top. Search by customer name or message text, or filter to Unread, Ready, Mine, or Closed. Each row shows the channel it came in on; tap a conversation to read the full thread and reply.
The More Tab
More is home to everything outside the bottom bar. Six quick tiles jump straight to Invoices, Customers, Recurring, Routes, Requests, and Alerts. The Requests tile carries a badge when new quote requests are waiting for review.
Settings on Mobile
Below the tiles, Settings lists Profile, Business profile, Team, Operations, Channels, Notifications, Payments, and Billing, the same settings screens as the dashboard, sized for a phone. Sign out is the last row.
Creating a Quote from Your Phone
Creating a quote on mobile: select a customer, add line items, set the schedule, and confirm in four steps
Quotes → New Quote
Tap the Quotes tab in the bottom bar, then tap the + button to open the create form.
Select a customer
Search by name and tap to select. The customer is locked in for this quote.
Add line items
Tap Add item and enter a product name, quantity, and unit price. Tap the product chips to add catalogue items in one tap. The totals card updates with each item.
Set schedule and notes
Optionally enter a delivery date, address, and internal notes. All fields are optional at this stage.
Review and create
The review screen shows the full quote summary. Tap Create quote to save as a draft. Open the draft to send it to your customer.
Today and the Route Map
Today lists the day's route as numbered, ordered stops with a progress bar, plus any assigned work that isn't on a route; tap a stop or work item to open it. Route shows the same stops on a map, color-coded by status, with a floating card for the next stop offering Delivered, Skip, and a button that opens directions in your phone's maps app. The expand icon opens a fullscreen map.
What Staff See
Staff get a focused four-tab app: Home shows today's assigned jobs with a running count, Work lists everything assigned to them and can be filtered to Assigned or Completed, Customers is a searchable read-only directory, and Notifications lists new assignments. There is no Quotes, Invoices, or Settings tab for the staff role on mobile.
Offline Mode for Field Staff
Drivers and staff can complete their assigned work without a network connection, and drivers their route stops too. Actions are queued on-device and synced automatically when connectivity returns. The sync state is shown next to each item: Saved on device, Syncing, Synced, or Needs review (when the server state changed while offline).
Troubleshooting
Symptom first, then the likely cause and the fix. Find what you are seeing below.
I cannot create a work order directly
Why it happens Enclava enforces a quote-first workflow. A work order is created automatically the moment a quote is accepted, and there is no manual option to add one directly.
Create a quote for the job, send it to the customer, and record their acceptance. The work order appears in Work Orders as soon as the quote is accepted.
I cannot edit an accepted quote
Why it happens Accepted quotes are immutable. The price and line items the customer accepted are locked in and cannot be changed.
There is no edit option on an accepted quote. Open it and click Duplicate to start a new draft with the same customer and items, adjust it, and send it as a new quote.
My driver sees 'No routes today'
Why it happens Your driver has not been dispatched a route for today, or they are logged in with the wrong account.
On the Routes page, confirm a route exists for today and has been dispatched to that driver. Check the driver's email on the Team page and compare it with the account they signed in with.
The route will not dispatch
Why it happens A route needs a person (a driver, you or a manager) and at least one stop. The Dispatch button stays disabled until a person is picked. Dispatch is also refused when a job on the route is held by someone other than the route's person: dispatch never takes a job away from whoever holds it.
Pick the person on the route card, then click Dispatch. If the route has no stops, use Plan Day or add one first. If Dispatch names jobs held by someone else, reassign each of them to the route's person on the Work page, or remove its stop from the route, then dispatch again. If it says someone else is changing these jobs, wait a moment and try again.
My customer did not receive the quote
Why it happens The most common causes are an incorrect email address or the message landing in spam. Enclava does not show delivery or bounce status for sent emails.
Open the quote and confirm the customer's email address. If it was originally sent by email, click Resend Email; otherwise resend it through the original channel and ask the customer to check spam.
The invoice email did not arrive
Why it happens This is the same deliverability issue as quote emails: a wrong address or spam filtering. The invoice must also be in Sent or Overdue status for a resend.
Confirm the customer's email address, then open the invoice and click Resend Invoice. This also resends the payment link if one exists.
A channel shows disconnected or reauth required
Why it happens The channel was manually disconnected (shown as disconnected), or the provider's access token expired or was revoked (shown as reauth required).
Go to Settings, Channels and reconnect it. WhatsApp and Instagram repeat the Meta setup; for Telegram, generate a fresh bot token with BotFather and paste it into the connect form.
The payment link does not work
Why it happens No payment provider is connected, or the provider was disconnected after the invoice was sent. A disconnected Mollie link stops updating immediately; an already-sent Stripe link keeps working even after Stripe is disconnected.
Connect Mollie or Stripe under Settings, Payments, then click Resend Invoice to generate a fresh link. If a Mollie link may already have been paid before you disconnected, ask the customer and use Mark Paid yourself.
A feature is locked or shows an upgrade prompt
Why it happens The feature is not included in your current plan.
Check your plan on the Billing page. Upgrading to a higher plan unlocks the feature immediately.
Changes I made offline are not syncing
Why it happens The device queued your actions while it had no network connection and has not reconnected yet, or an item needs your review because the server state changed while you were offline.
Check the sync status next to the item: Saved on device or Syncing means it is waiting to sync. Reconnect to the network, and open any item marked Needs review to resolve it.
I cannot delete a record
Why it happens This protects the audit trail: closed work orders and accepted quotes are immutable by design, and no invoice can be deleted.
Use the available state change instead of deleting. Cancel a quote or work order that has not progressed yet, or dispute a completed work order before you close it if something needs correcting.
A team member cannot see a page
Why it happens Pages are shown or hidden based on role: owner, manager, staff, or driver.
Open the Team page and check the person's role against the roles and permissions table in this guide. Change their role if it does not match what they need to do.
My quote expired before the customer answered
Why it happens Every quote has a Valid Until date. Once a Sent quote passes that date without a response, Enclava marks it Expired automatically.
Open the expired quote and click Duplicate. The copy gets a fresh 30-day Valid Until date, ready to review and send again.
A stop was skipped on a route
Why it happens A driver can skip a stop when a delivery cannot be completed, for example the customer was not home. The work order stays assigned, and the route moves to Needs Review once every other stop is done.
Open the skipped stop from the route card and decide how to handle it. Remove it from the route to return the work order to the unrouted pool, then add it to another day's route.
I generated an invoice but need to change it
Why it happens Invoices are generated from closed work orders and cannot be edited afterward. Once a work order is linked to an invoice, that link is permanent, even if you cancel the invoice.
If the invoice has not been paid, cancel it from the invoice panel to stop collecting on it. There is no way to generate a replacement invoice for the same work order, so review the totals before you click Generate Invoice.